
Here is the concept drawing.

And the final result.
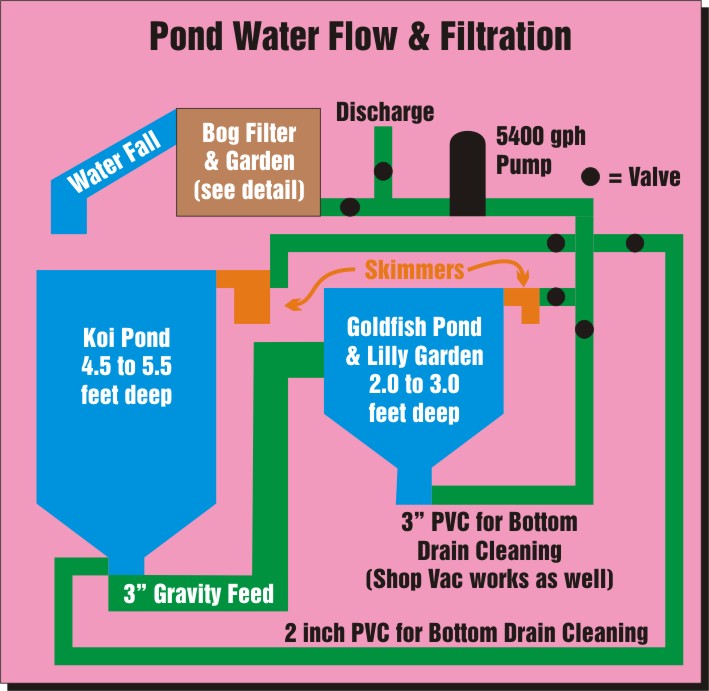
The pond "system" consists of a 4-1/2 to 5-1/2 foot deep koi pond and a 2 to 3 foot deep goldfish pond. Both bottoms slope towards a bottom drain. The bottom drain on the koi pond gravity feeds into the side of the goldfish pond. Thus the goldfish pond serves as a settling tank for the koi solid waste.
Water exits both ponds from skimmers that feed the pump. The pump system is composed of two identical 5400 gallon per hour pumps that are run on alternating months so that when one fails, the other is ready to take over.
Normally, the ball valve on the koi skimmer is left wide open and the one on the goldfish skimmer is at about half open. This results in a water level height differential of about 3 inches. Opening the goldfish skimmer valve more would result in a larger differential and faster flow from the koi pond to the goldfish pond.
The 2-inch line running from the Koi pond bottom filter directly back to the pumps was a last minute thought and I am so glad I installed it! I have used it several times to suck gravel and other debris that settles in the bottom plumbing and will not flow through to the goldfish pond. Using this line as the only feed to the pump pulls water from the goldfish pond, cleaning that piping. Then I plug the line in the side of the goldfish pond and the suction through the Koi bottom filter increases enough to clear anything inside the bottom drain and even pull 3/4-inch pieces of gravel into the pump filter basket.
In the original design, I did not properly estimate the difference in water levels between the two ponds, so I mounted both skimmers at the same elevation. I later had to lower the goldfish skimmer by one inch so it would not run out of water when the pond levels went down from evaporation.
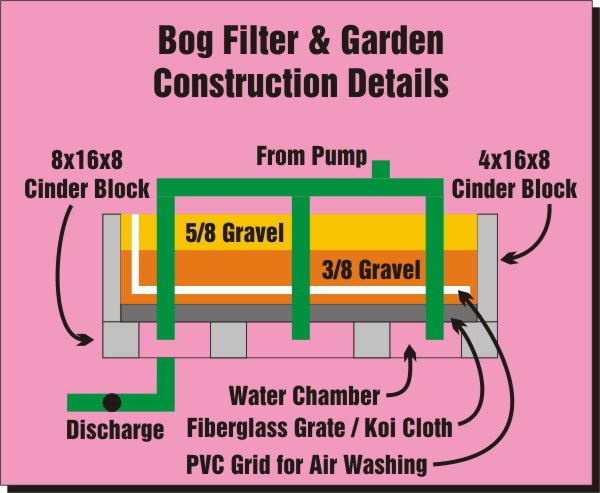
The bog filter was designed after spending many hours discussing filtration with Buddy Caulk. It incorporates many of the features he had in his filtration systems. I left a water chamber and bottom drain below the gravel so I could pump it out. I also laid a grid of PVC pipes with 1/4-inch holes drilled in the bottom so I could blow air in to help scrub the gravel.
I did depart from Buddy's design by using smaller gravel than the 3/4-inch that he used. I've since been told that I have too much depth to the gravel and that only about 16 inches is all that is needed. However my water is crystal clear, so the extra apparently has not caused any problems.
I clean the gravel once a year, usually over the Thanksgiving holiday. I start by removing all the bog plants, and that can take a day if the umbrella palm has dug in. I plant this stuff in long plastic troughs, but it out grows the "pot" over the course of the year. The rest of the plants are easy to remove.
Next I use a spa blower to bubble air up through the gravel, while stirring with a 1/2-inch steel rod that I welded a T handle on to. I then pump from the bottom of the filter out to discharge. Then I fill the filter with a submersible pump in put in the koi pond. I repeat this sequence 6 or more times until the water coming out the discharge is clean. It's a whole lot easier than shoveling the gravel out, scrubbing it, then shoveling it back in.
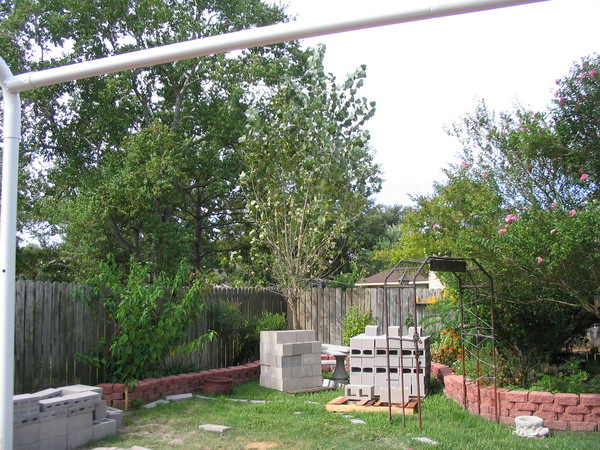
 The yard before the pond.
 Ordered the block before hurricane Rita in case they were hard to get later.
 One of several layouts we looked at.
 Had to dig a few holes to make sure we knew where the utilities were.
Once the design was done, I laid some pipe next to our patio because it would be covered by the concrete around the pond edge. I laid an extra empty 3-inch piece just in case we wanted to run something from one end of the pond to the other later.
We hired a concrete crew to pour a 4-inch thick by 14-inch wide beam around the perimeter of the pond. The water fall and bog garden have the same 4-inch slab below them, with a big cut out under the bog garden so we could put a bottom drain in it. The framing took more than a day because of all the curves and cutout. The pour was a relatively insignificant amount of concrete, so we widened the driveway at the same time to better justify a load of concrete.
After a few days of curing, we had the guys with shovels come in. They thought they would be able to finish the hole in one day, but it ended up taking two full days and the pond still was only 5-1/2 feet deep instead of 6-1/2 feet. They worked by the hole instead of the hour and really earned their money.
The day after the mason showed up and ran a course of 6-inch wide cinder block around the perimeter. The bog garden had a course of 8-inch wide block on the bottom, followed by 4-inch wide block. This provided a shelf to put the grate and koi cloth on to keep the gravel out of the water chamber. We waited to after the liner was in to stack block in the area of the waterfall to make a base for the rock we would move in later.
We let the mortar cure for a day while my son and I laid the piping between ponds and finished up the rest of the plumbing. We had already purchased the koi skimmer, so we dug the hole for it too.
Then Justin Bristol of Pond Pros (who was working for Nelson's at the time) came in with the liners and skimmers. There's a liner for the goldfish pond, another for the Koi pond that extends up across the water fall and down through the bog filter, and a third for the bog filter that runs out across the waterfall area and down into the Koi pond. So there's a double layer of liner in the bog filter and across the waterfall. Of course, we laid sand in the bottom of the ponds to soften it and then weed block across everything to help prevent punctures later.
Justin also brought out a 2-inch thick fiberglass grate that we fitted into the bog garden, supporting it on the shelf formed by the two sizes of block and a couple more blocks in the center.
We let the adhesive around the bottom drains and skimmers cure for a day and then filled the pond. Meanwhile we washed the cinder block that would sit below the waterfall with white vinegar so it would form a salt coating and not leach into the pond making the pH too high.
Amazingly, when we turned the pump on, everything work great. The water flowed out of the bog filter in an even sheet and there was less than 1/4-inch variance in the height of the pond walls.
The next job was to place two courses of red Windsor wall blocks around the perimeter of the ponds. The liner came over the cinder block and under the Windsor wall. We trimmed the liner back from the outer edge of the Windsor wall so it wouldn't show.
We bought 2 yards of 3/8-inch gravel and 1 yard of 5/8-inch. We washed it best we could in a wash tub and dumped the smaller in the bog filter first, topping it off with the larger. The water in the pond turned absolutely filthy, but the next day all the remaining dust had circulated back into the bog filter and the water was perfectly clear.
We spent quite a bit of time shopping for moss rock for the waterfall and to line the outside of the bog filter. Lots of places had it, and the price varied quite a bit. We found he best deal and San Jacinto Stone, where we paid .065/lb for boulders and .07/lb for a pallet of stackable moss rock. We had to hire some day labor to help us get the boulders in to place.
The water flowed out of the bog garden and down the back of the boulders, where it traveled beneath them and out to the pond. We got some sacks of mortar mix and dark brown concrete tint from Southern States Building Specialties and began filling the cracks. Finally the water was flowing across the top of the boulders and we had the look we wanted. The mortar mix was practically invisible and completely disappeared once algae began growing on it. Of course, all the concrete products had to be cured with vinegar.
We finally moved all the stackable moss rock from the driveway to the sides of the bog garden and waterfall. That took quite a while. The last bit of heavy work was placing flagstone slabs on top of the Windsor wall and cinder blocks. we bought some slabs and cut them to size with a cheap circular saw and diamond blade. Lots of dust and slow going.
Finally we were ready for some fish. We completely drained the pond because of all the vinegar we had put in and filled it again with fresh water and a lot of dechlor. We bought 10 feeder comets from Pets Mart and put them in the goldfish pond to see if they would live. After two weeks we knew we were ready for some Koi and club members were quick to donate some of their rejects. Those rejects were beautiful to use and many are still to be found in the pond.
A couple of months later we discovered a hawk sitting on the fence behind the pond. He made a dive for a fish and we put up a piece of shade cloth, which he would not fly under, to keep him at bay. As the weather got warmer, the algae began to grow, and grow, and grow. We must have fished out ten pounds of string algae each week during that first spring. The UV light in the koi skimmer kept the free floating algae at bay, but did nothing for the sting algae. The next year we discovered a wonder chemical called Algae Fix. It really reduced the amount of string algae, but you must be careful to not over dose the pond or your fish will die! Now that our pond is mature, we get very little algae. We still use the UV filter and Algae Fix, but only for a couple of months in the spring.
The Great Bog Fiasco of December 2010
I'm sure the culprit was the Umbrella Grass I had been growing for the last five years. Each winter I took the grass out and cut it back to just root stock, and by the Spring it had taked over again. This year I planned on permanently removing the grass as it was listed on the new Texas list of banned species. Just before the end of the year it was determined to be a native species and removed from the list, but mine is in the garbage now anyway.
 The back wall leaning.
 Wednesday morning I began sucking the gravel out with my Shop Vac.
 This was the beginning of the stack of gravel.
 And this is what it looked like as I neared the end Friday morning. The Shop Vac really hung in there.
 A contractor showed up to help remove the plumbing and bog internals. They leaned the wall back up.
 And it was decided to pour a new cap and tie it into the sides with rebar.
 Form bracing was a challenge.
 And tools were rather primative. We let the concrete cure until the following Tuesday.
 The results looked good. They also braced the wall with rebar and used mortar to smooth everything.
 They sanded the surfaced to make sure no rough edges were left to puncture the liner.
 We replaced the padding and liner and set the cinder blocks that support the center of the grate.
 Here's a shot of the bottom drain I usually drain the bog through.
 Then we replaced the grating and plumbing inside the bog.
 I filled it with water and let it sit overnight to make sure there were no leaks before putting the gravel back in.
 Wednesday morning and no leaks! So the gravel went back in.
 And everything was pretty much back to normal.
Needless to say, if you are planning a bog garden with 4-inch block, I would recommend using rebar and pouring concrete through the block.
If you have any questions I haven't answered here, email me at paul@ppgibson.com .